GETTING STARTED
with SQL Compliance Manager
Table of Contents
- Purpose of this document
- Introduction
- Why use SQL Safe Backup?
- SQL Secure architecture
- Product components
- System requirements
- Console Install Requirements
- Collector Permission Requirements
- Port Requirements
- SQL Secure Capabilities
- Set strong security policies mapped to industry regulatory guidelines
- Prevent Security Risks and Violations
- Identify vulnerabilities
- Report and analyze user, group, or role permissions
- User Permissions Report
- All User Permissions Report
- Server Roles report
- Object permissions (within the explore permissions view)
- Deliver Detailed Security and Permission reports daily
- Deploy reports to SQL Reporting Services
- Compare security, risk, and configuration changes over time
- SQL Secure snapshot alerting
Purpose of this document
This document is intended to be a helpful guide to installing, using, and getting the most value from the Idera SQL Secure product features.
Introduction
SQL Secure is a security analysis solution which identifies SQL Server security violations, potential vulnerabilities, and risks. It lets you see who has access to what and how permissions are granted.
Why use SQL Secure?
- Set strong security policies mapped to regulatory guidelines – View a complete history of SQL Server security settings and designate a baseline to compare against future changes, providing a valuable audit trail for forensic analysis. SQL Secure provides a variety of checks which align with fundamental security best practices and industry standards.Idera provides easy-to-deploy policy templates. Idera has taken the security standards to which most companies are held accountable and developed customizable templates that allow you to extract the information needed to satisfy security auditor’s requirements. Choose from templates for PCI, HIPAA, and FERPA, which leverage guidelines from STIG and CIS.
- Prevent security risks and violations – SQL Secure provides an Idera defined Level 2 security check for balanced intrusion protection that leverages MSBPA and CIS guidelines and more. The security report card identifies top security vulnerabilities on your servers. Each security check is categorized as High, Medium, or Low Risk. You can drill into each security check to get more detail.
- Identify vulnerabilities – Understand who has access to what and identify each user’s effective rights across all SQL Server objects. Drill down by user or group to shed light on areas where security vulnerabilities may exist or have a chance of developing. Use the report catalog to track vul¬nerabilities, security changes, and user entitlement over time.
- Report on and analyze user, group, or role permissions – Analyze membership to powerful server roles and groups, such as administrators, systems administrators, and security administrators to ensure each user’s level of access is warranted. From a group, see the list of group members and select a member for further analysis. From a user, see the group memberships and drill upwards to view inherited permissions.
- Deliver detailed security risk reports – Idera SQL Secure provides 23 reports out of the box, each of which contains flexible parameters to easily create the types of reports that display the data that auditors, security officers, managers, or administrators require.
- Compare security, risk, and configuration changes over time – Reports such as the snapshot and assessment comparisons provide an easy way for comparing security, configuration, and risks between different time periods.
- SQL Secure snapshot alerting – Notifications when SQL configuration changes are detected that present a new risk.
SQL Secure architecture
The SQL Secure architecture footprint is small and consists of a console and a SQL Server database repository. SQL Secure does not require any agents, databases, or stored procedures to be deployed to the remote SQL instances. SQL Secure leverages the SQL Server agent on the same SQL instance where the SQL Secure repository resides in order to gather the security and configuration data snapshots. SQL Secure requires access to the SQL Servercconfigured port so that it can capture security and configuration data within SQL Server. It also requires RPC (port135) access to gather other relevant security and permission data from the file system and registry outside of SQL Server.
Product components
The SQL Secure Console component is the interface you use to set up and manage your SQL Secure configuration, view and search your audit snapshots for user and object permissions, and generate reports to display the audit information that is most important to you.
The SQL Secure Repository is where your audit snapshot information and SQL Secure configuration information is stored. You can schedule routine grooming that automatically deletes snapshots older than a specified date.
The SQL Secure Collector gathers SQL Server permission information from your audited SQL Server instances (using your filter criteria) and stores the information in the SQL Secure Repository database.
The audited SQL Server instances are SQL Server instances that have been registered with SQL Secure. These SQL Server instances are audited periodically at the dates and times you choose. The resulting data is stored in the SQL Secure Repository and displayed in the SQL Secure Console as a snapshot of your SQL Server security model.

System requirements
A typical install sets up all SQL Secure components on the same SQL Server computer. The following table lists the requirements for a typical installation.
| HARDWARE/SOFTWARE | REQUIREMENT |
|---|---|
|
CPU
|
2.0 GHz or higher
|
|
Memory
|
2 GB
|
|
Hard Disk Space for Repository
|
30 GB
|
|
32-bit or 64-bit Operating System
|
Either:
Plus:
|
|
Microsoft SQL Server for Repository
|
SQL Server 2005 SP1 or later
SQL Server 2008 SQL Server 2008 R2 SQL Server 2012 RT M |
|
Microsoft SQL Server for the audited instances
|
SQL Server 2000
SQL Server 2005 SQL Server 2008 SQL Server 2008 R2 SQL Server 2012 RTM SQL Server 2014 |
|
Browser for online Help
|
Internet Explorer 7.0 or later
|
Console Install Requirements
A console-only installation installs the SQL Secure Console. The console-only installation assumes that a full installation has already been completed on another machine. The following table lists all the requirements for a console-only installation.
| HARDWARE/SOFTWARE | REQUIREMENT |
|---|---|
|
CPU
|
2.0 GHz or higher
|
|
Memory
|
2 GB
|
|
32-bit or 64-bit Operating System
|
Either:
Plus:
|
|
Browser for online Help
|
Internet Explorer 7.0 or later
|
Collector Permission Requirements
The following requirements are necessary for the SQL Secure Collector to be able to access the SQL Server instances you want to audit. During install, you can input credentials for a Windows user account or SQL Server login.
| TYPE | REQUIREMENT |
|---|---|
|
Windows permissions
|
A Windows user account that has local Administrator permissions
|
|
SQL Server privileges
|
A Windows user account that is a member of the sysadmin fixed server role on the SQL Server instance
|
Port Requirements
| TYPE | REQUIREMENT |
|---|---|
|
SQL Server Object Permissions and configuration collection
|
Port 1433 (or the configured SQL instance port for the audited instance)
|
|
Windows file system and registry permissions collection
|
Port 135 (RPC connectivity)
|
SQL Secure Capabilities
Security tools naturally seem to to be complex and unintuitive when you first start using them. Idera SQL Secure takes away the complexity and makes it very easy to add SQL instances and get started with security analysis. Adding an SQL instance is the first step in gathering data in preparing yourself for regulatory accountability. Assuming that all of the appropriate permissions are applied and the default SQL port is being used, here are the steps for adding a SQL instance to be audited.
Adding a SQL instance to be audited within SQL Secure can be accomplished by following these steps:
Open the SQL Secure console.
- Select the File menu and choose the option to “register a SQL Server”:
- Bypass the welcome screen and type in the SQL instance name to be audited
- Type in the audited SQL instance sysadmin credentials and the RPC local admin credentials. Click “next”.
- The next screen offers a filtering capability to eliminate any objects from being analyzed which are not required for the snapshot or the audit. Select “next”.
- The next screen in the wizard allows the administrator to setup snapshot scheduling and grooming options. After defining these options, select “next”.
- The next screen provides the option to set up alerting for any critical issues that are discovered after the snapshot. Click “next”.
- The next screen within the wizard displays options for adding the SQL instance to a governance policy. The policies provide specific checks aligned with fundamental security analysis best practices, such as:
A. Center for internet security(CIS)
B. Security readiness review(SRR)
C. System Network and attack center(SNAC)
D. Microsoft Best practices
E. Idera Security best practices - Select the finish option on the wizard and the configuration of the auditing of the SQL instance is complete.
Idera SQL Secure can easily manage the auditing of hundreds of SQL instances in multiple network segments, each of which in turn can have its own management requirements. The first step we’re going to look at is how to set strong security policies for managing various segments and data within your network environment. SQL Instances and their hosted data may have a variety of security policy and regulatory requirements based on the types of data stored within the hosted databases. SQL Secure policies will make it easier to manage the diverse SQL instances within a large environment.
Set strong security policies mapped to industry regulatory guidelines
Idera has worked with many large customers and well known firms such as Ernst and Young to establish the best ways to approach auditing so you can deliver the appropriate reports that answer auditor questions. As a result, SQL Secure provides a variety of customizable policy templates which analyze a variety of SQL configuration areas and answer to fundamental security best practices and standard requirements such as:
- Center for Internet Security (CIS)
- Security Readiness Review (SRR)
- System Network and Attack Center (SNAC)
- Microsoft Best Practices
- Idera Security expert best practices
SQL Secure also provides policy creation templates for more specific enforcement of regulatory guidelines:
- Health Insurance Portability and Accountability Act (HIPAA)
- Payment Card Industry Data Security Standard (PCI DSS)
Unique customized policies can also be created for the purpose of analyzing security configurations based on one’s own unique internal requirements.
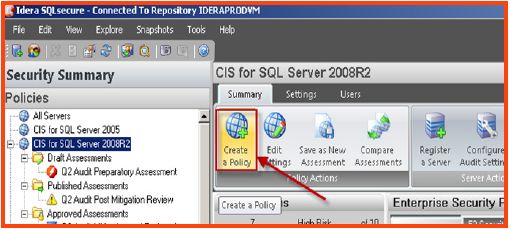
Here are the simple steps for creating a new policy
- Start the policy wizard

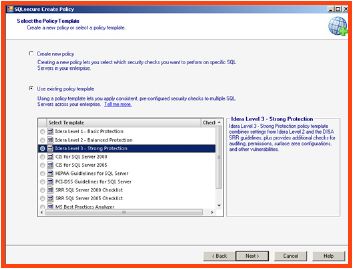
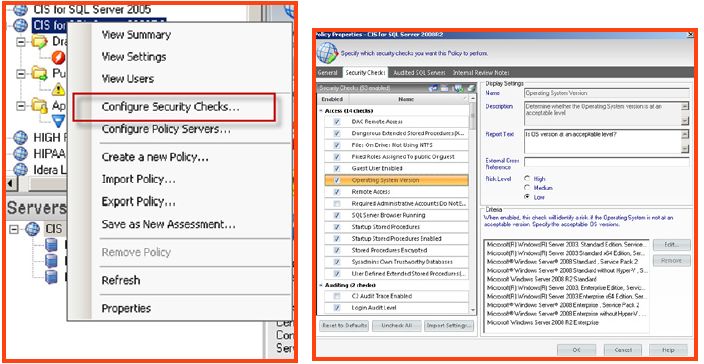
- Skip the welcome screen and select the policy that best meets the environment security requirements. Custom policy templates have been provided to make it easy to deploy custom security checks aligned with industry best practices.

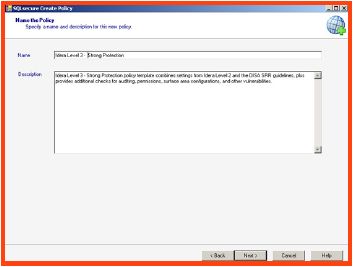
- On the next screen, provide a friendly policy name that best describes the policy and security checks for your environment.

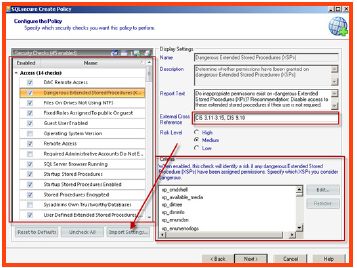
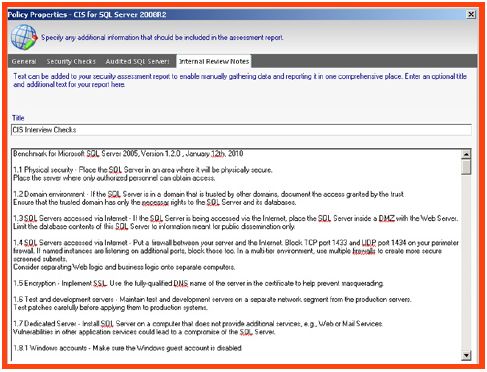
- On the next wizard screen, a complete list of security checks is enumerated, which aligns with the previous selected policy template. Adjustments can be made to any of the security checks individually if required. If a custom policy is being created; then the “Import option”, allows the SQL Secure administrator to be able to import any of the provided templates to use as a foundation of security checks. After the importing the settings, adjustments can be made. Notice the cross reference to security documentation which is listed on the review notes tab.

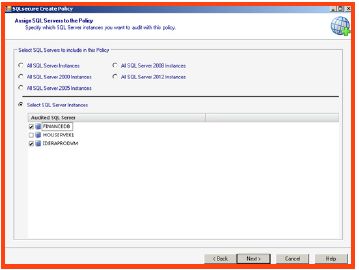
- On the next screen, select the instances or group of instances to which this policy applies.

- The next screen displays cross-reference notes for any imported policies that were applied. If the policy is a custom policy, then the SQL Secure administrator may choose to modify the cross-referenced document title and notes to provide their own various references.

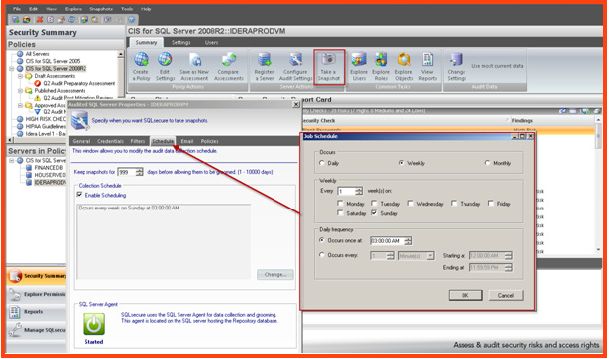
- Click Finish to apply the new policy. A data collection snapshot is required to capture the security and configuration data, which displays the results for the Security policy checklist. A snapshot can be performed manually (ad-hoc) or scheduled to run on a regular basis.

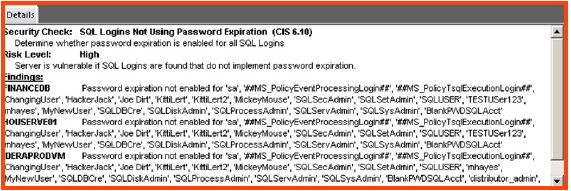
Prevent Security Risks and Violations
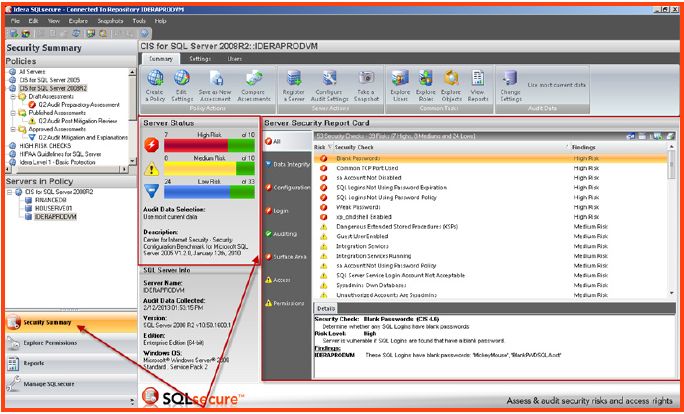
After collecting the security and configuration data from a snapshot, Security checks will be listed within the SQL Secure console security report card. This information is useful for identifying specific risks and vulnerabilities. This console should be viewed regularly to ensure that certain configurations do not change that may present a new vulnerability or risk. To identify risks displayed within the Report card.
- Select the “Security summary” tab and view the security risks “report card” displayed on the right-hand side of the screen. It is possible to focus on specific risks and manage the risks and security issues based on the following groups:A. All security risks – Displays all of the security checks and risks
B. Data integrity risks – Operational check for snapshot integrity and validity
C. Configuration risks – Displays SQL server configuration checks and risks
D. Login risks – Displays checks and risks associated specifically with logins
E. Auditing risks – Displays whether risks are associated with SQL native auditing configuration
F. Surface Area risks – Displays any risks associated with the SQL Surface area configuration
G. Access risks – Displays any risks associated with inappropriately configured access settings
H. Permissions risks – Displays any risks associated with inappropriate permission/restriction settings
- Browse the details pane at the bottom of the report card to view more descriptive information about the security findings and potential risks.

- Take immediate action to address the discovered risks. If the policy risk is allowable/forgivable, then it may be necessary to modify the policy settings by right-clicking on the policy (in the left hand window pane), and selecting “configure security checks.” This will allow the security policy checklist to be modified so that it is more or less restrictive

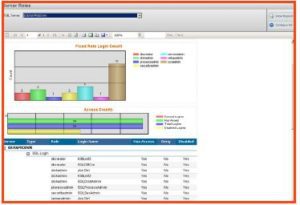
Server Roles report
User permissions are often assigned through role-based permissions. A user who is part of a SQL Server role that holds more elevated permissions (than does the user alone) will also have these elevated permissions unless they are explicitly denied. The ‘Server Roles’ report provides information about which users are members of the roles and what their permissions would be as a result.
- Select the Report tab on the left side of the console.
- A list of available reports is displayed.
- Choose the date and time that represents the required reporting point in time on the calendar
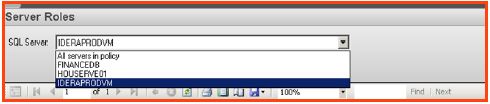
- Select the policy you wish to use to enumerate specific servers. Select the “Server Roles” report from the list.
- On the right-hand side, the report is visible with a single parameter for choosing individual instances or all instances.

- After selecting the SQL instance or instances within the policy, select the option to “view report.” The data displayed includes the permissions data for all roles, including the users who have access because they are part of the role. The data can easily be printed or exported using the tool bar at the top of the report window.

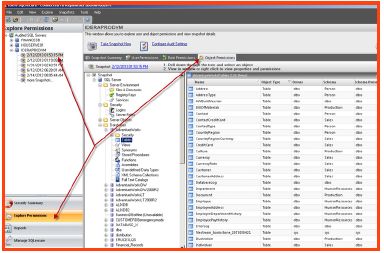
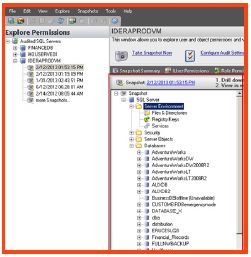
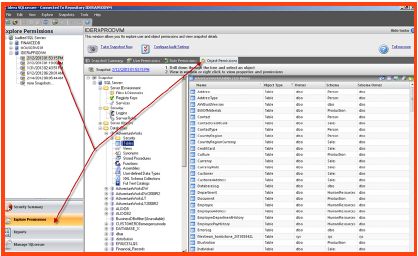
Object permissions (within the explore permissions view)
The explore permissions feature has been previously discussed for explicitly viewing Windows user, Windows group, SQL role and SQL authenticated account permissions for a SQL instance and database. It allows the administrator to analyze and understand these permissions quickly, to identify security risks. But the ‘explore permissions’ tab also provides an object explorer that allows the administrator to view the individual permissions from a point in time for objects such as:
- SQL Server Files and Directories
- Security objects (Logins and Server roles)
- Configuration of SQL Server running services
- SQL Server registry key permissions
- SQL Server objects such as:
- Databases
- Tables
- Views
- Synonyms
- Stored Procedures
- Functions
- Assemblies
- User defined data types
- XML Schema collection
- Full text catalogs
To take advantage of the object explorer to drill down into object permissions from a point in time:
- Select the “Explore permissions” tab on the left of the console, choose a snapshot date and time on the upper left hand side of the console, and select the “object permissions” tab on the top right.

- The middle SQL Secure console pane represents the collects object areas displaying a complete list of all SQL areas that were analyzed during the snapshot process.

- The administrator can browse through the SQL snapshot areas and choose to display a complete list of underlying objects. These objects can likewise be selected to view related configurations and individual permissions.

Deliver Detailed Security and Permission reports daily
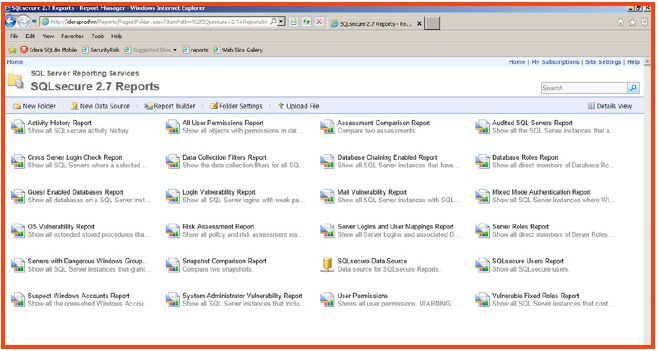
Idera SQL Secure provides 23 reports out of the box, each of which contains flexible parameters to easily create the types of customized views of data within the reports. This is the data that auditors, security officers, managers, or administrators require. The reports are classified into 4 categories of reporting, which include:
- General – Reports for cross server login access, security risk, and SQL Secure product users
- Entitlement – Reports for security permissions analysis
- Vulnerability – Reports for dangerous SQL configurations
- Comparison – Reports for comparing configurations or permissions between snapshots
To share the report data with others who may not have SQL Secure access, the reports can be published to SQL Server Reporting Services. Through SQL Server Reporting Services, email subscriptions can be established to ensure that critical security and risk assessment reports are received on a regular basis.
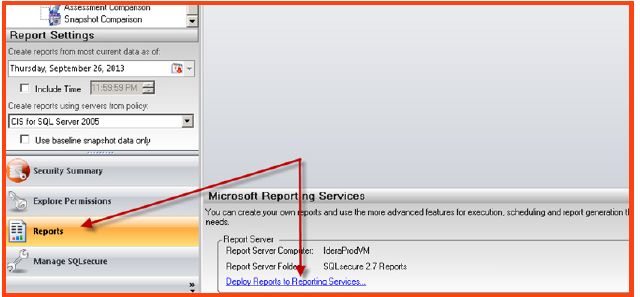
Deploy reports to SQL Reporting Services
To deploy the reports to reporting Services:
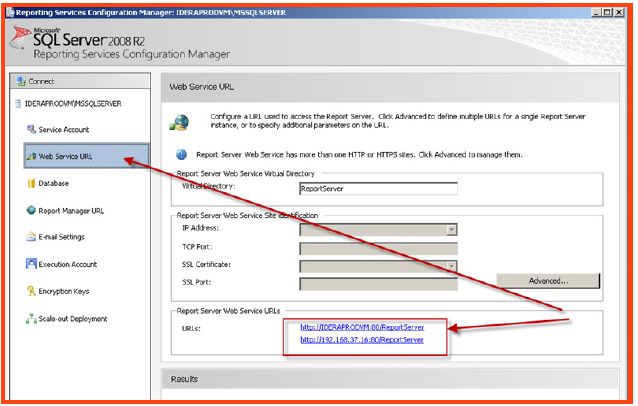
- Make sure that you have installed and properly configured SQL reporting Services (SSRS,) or make sure that you have access to a SSRS server that has already been deployed.

- Review the reporting Service URL from the SSRS web service configuration screen

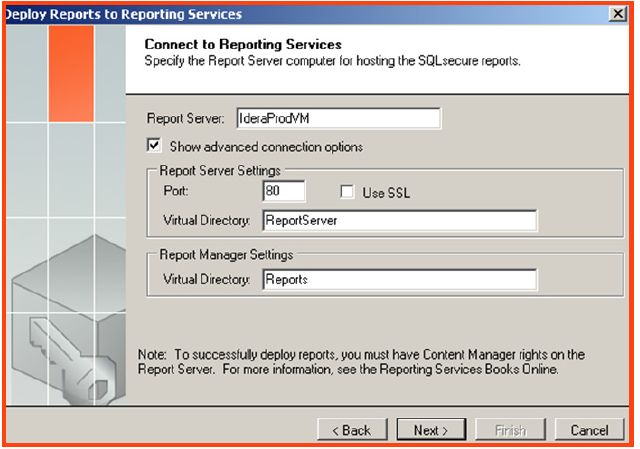
- In the SQL Secure console, select the “reports” tab on the left and side of the screen and click the “deploy reports to reporting services” button at the middle and bottom of the screen.

- A wizard will pop up and walk through the rest of the deployment process. Select the advanced options within the wizard to specify unique SSRS configuration settings.
- Select “Next” and, on the following screen, supply the required SSRS credentials that have administrative access to SSRS. Click “Next”
to complete the deployment.
- The reports will be available within SSRS after the wizard is completed.

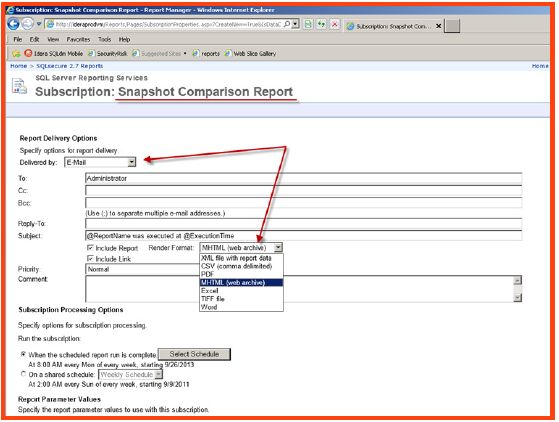
- The individual reports can also be setup within SSRS to be generated and emailed automatically using SSRS subscriptions. Right click on any report and select the option to subscribe. Then configure the subscription parameters schedule and report format based on internal management requirements.
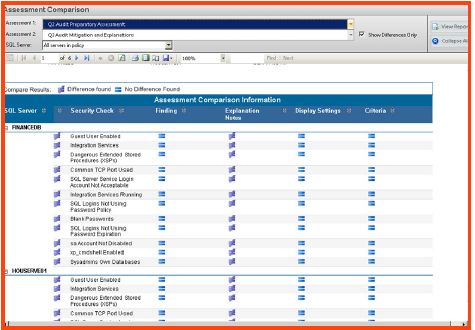
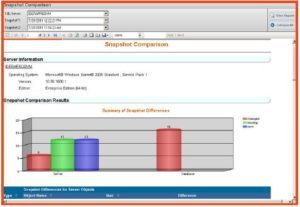
Compare security, risk, and configuration changes over time
A big part of the strength of SQL Secure lies in its ability to report on different aspects of SQL security and configurations. But with so many objects making up the SQL environment and so much DBA activity there may be multiple areas that hold security concerns based on change activity. To allow a DBA to quickly address these issues, comparison reports are available for reviewing the differences in object permissions and SQL configurations from two different periods of time. Noticing the differences and noting what changes have been made will help the DBA to be quickly accountable and mitigate the risks correctly the first time. Two specific reports are available under the “reports” tab and under the comparison reports folder, which can be used for comparing Security differences as well as the configuration (risks) differences between 2 different snapshots’ time periods.
- (Risk) Assessment Comparison Report- compares audit assessments to display the differences in noted risks

- Snapshot Comparison Report – analyzes the security and permissions differences for the server and databases

SQL Secure snapshot alerting
After SQL Secure has been configured and is capturing security, configuration, and permissions data regularly, the administrator can review the details within the console and “harden the environment” against potential risks and vulnerabilities. Alerting can be configured to ensure that the administrator of SQL Secure is notified if changes occur that present new risks or reduce the integrity of the “hardened” SQL environment.
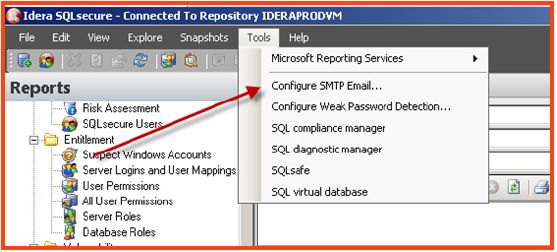
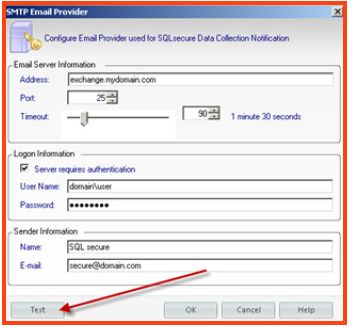
To setup SQL Secure email alerts it is first necessary to make sure that SMTP Server communication has been established.
- In the SQL Secure Console, select the “tools” menu option and select the “SMTP

- Configure the appropriate SMTP configuration and select the “test” button to test communication.

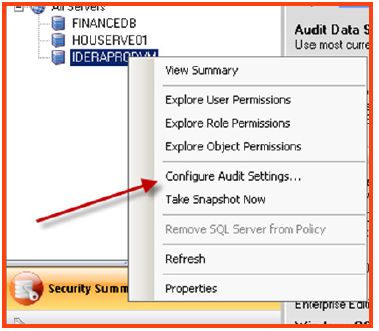
- Select the “Security Summary” tab on the left side of the console. Select a policy to see its related SQL instances. Right click on an instance and choose “Configure audit
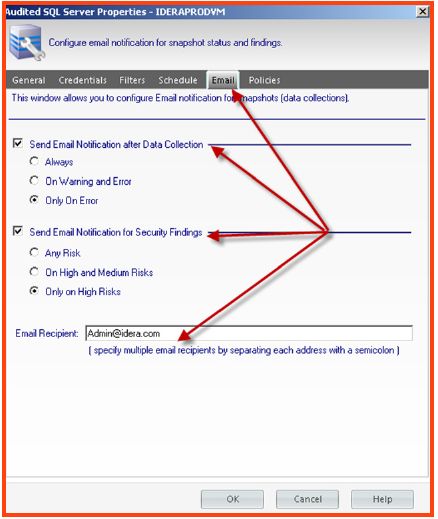
settings.”
- A window pops up displaying the audit settings configuration for the instance. Select the “Email” tab at the top of the window and configure the required settings for notification and the email addresses of the recipients.